 I used some of the foam block you saw in the last post to carve this. It will be a housing for an arm mounted radio frequency locator used to track down my radio emitting guerrilla sculptures. After carving the foam I than began to smooth it out and add texture by skinning it in plasticine. When It is done I will make a silicone rubber mold of the positive and make a polyurethane resin cast. After the resin model is made it will house the LCD, Arduino, and Radio receiver you see in the pic below. The LCD and speaker let you know when you are getting close to one of my radio frequency emitting sculptures. You will be able to wear the piece on your forearm.
Showing posts with label Arduino. Show all posts
Showing posts with label Arduino. Show all posts
Friday, August 6, 2010
Top secret: work in progress
Here is some top secret pics of one of my works in progress.
 I used some of the foam block you saw in the last post to carve this. It will be a housing for an arm mounted radio frequency locator used to track down my radio emitting guerrilla sculptures. After carving the foam I than began to smooth it out and add texture by skinning it in plasticine. When It is done I will make a silicone rubber mold of the positive and make a polyurethane resin cast. After the resin model is made it will house the LCD, Arduino, and Radio receiver you see in the pic below. The LCD and speaker let you know when you are getting close to one of my radio frequency emitting sculptures. You will be able to wear the piece on your forearm.

I used some of the foam block you saw in the last post to carve this. It will be a housing for an arm mounted radio frequency locator used to track down my radio emitting guerrilla sculptures. After carving the foam I than began to smooth it out and add texture by skinning it in plasticine. When It is done I will make a silicone rubber mold of the positive and make a polyurethane resin cast. After the resin model is made it will house the LCD, Arduino, and Radio receiver you see in the pic below. The LCD and speaker let you know when you are getting close to one of my radio frequency emitting sculptures. You will be able to wear the piece on your forearm.Thursday, August 5, 2010
Mold making!
I recently made myself some plexiglass mold walls and got to mold making!

I like using plexi-glass for mold walls so that you can see that whatever material you are pouring is getting even distribution (but really it just looks cool).
I decided to pour a block of rigid polyurethane foam so that I could carve it into positives for other sculptures, specifically for my line of wearable arduino enabled reactive sculptures which I will show you some progress on in tomorrows post!
I really like to carve in foam because you can use all of the wood carving tools like gouges and never have to worry about the grain. Foam carving is easy breezy baby.

I like using plexi-glass for mold walls so that you can see that whatever material you are pouring is getting even distribution (but really it just looks cool).

I decided to pour a block of rigid polyurethane foam so that I could carve it into positives for other sculptures, specifically for my line of wearable arduino enabled reactive sculptures which I will show you some progress on in tomorrows post!
I really like to carve in foam because you can use all of the wood carving tools like gouges and never have to worry about the grain. Foam carving is easy breezy baby.
Monday, July 5, 2010
Hey everyone I hope you all had a fun and productive fourth of July weekend. I know I did! I just wanted to share some of my progress here on the blog. For a while I have wanted to continue my series of digital artifacts by making a device that when blown into sends messages to twitter based on your blood alcohol content, like some sort of digital web2.0 party horn. I got the necessary parts for it on Thursday and began working on it on Friday. I had initially thought it would take the course of the semester to complete, but once I started I got obsessed! I finally got the entire thing working sensor, twitter, bluetooth and all yesterday. The best part was testing it on my drunk friends celebrating the 4th!
Here is a pic of it naked, i still need to make a cool case for it:

The code still needs some fine tuning and I would like it to also play sounds, which shouldn't be hard to incorporate. The best part is that I am finally starting to feel competent with writing the code and wiring the devices. When I started this program in January I had never written a computer program in my life.
Also just recently I have had this idea for a movie or maybe more of a tableaux. I want to create a hyper-linked 3D tableaux of ambient scenes aesthetically composed of a combination of dioramas, collage, and real footage. So when I wasn't obsessing over my twitter breathalyzer I took some time to start putting this together. Here is just an initial low-res mock-up.
Hopefully when I have some more time i post a complete tutorial to making the breathalyzer.
Tuesday, April 6, 2010
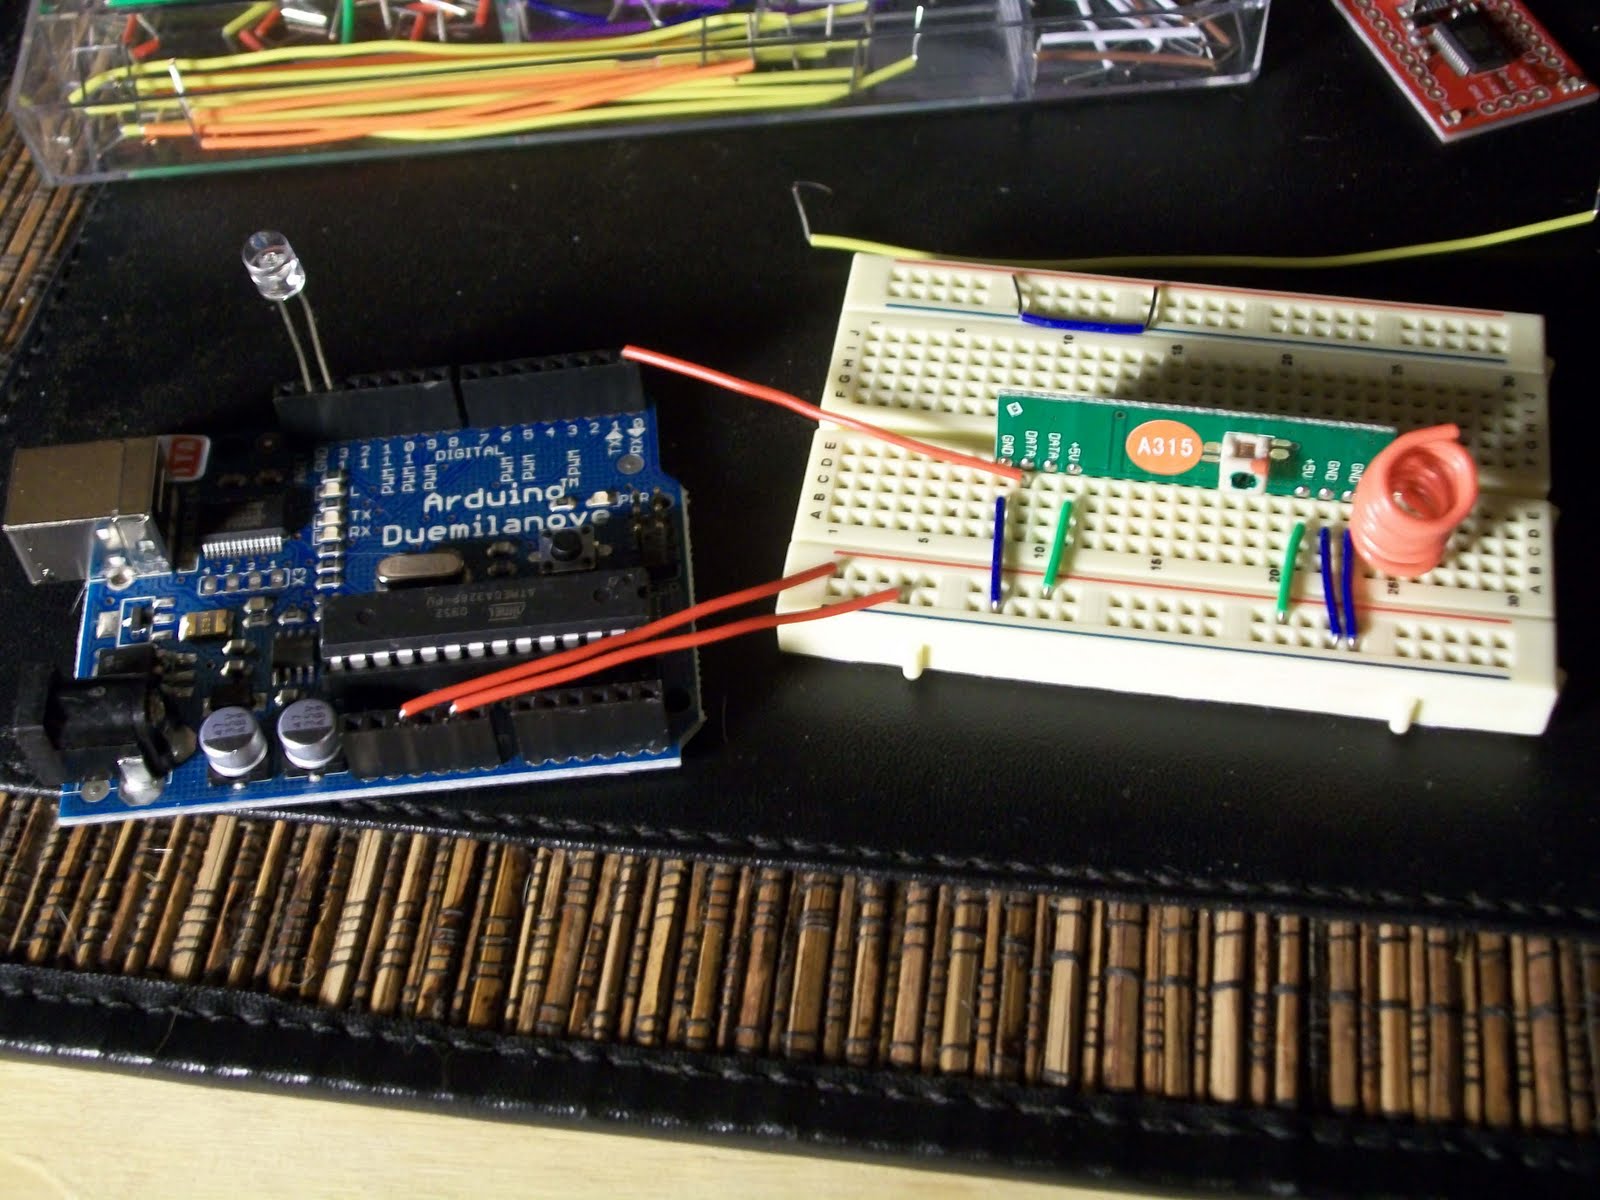
Arduino radio TX/RX
It's late and I'm tired. Here is most recent shots of progress on radio TX and Arduino RX . This is more for my game project for the locating device but the things i have learned working on it apply to the mood broadcaster that I am working on as well. I modified another example I read in which the person used a 555 timer and potentiometer to blink an LED w/o an MCU or any other device. It was my hope that instead of the output timer of the 555 timer leading to an anode of an LED i would instead hook it to the data pin of the TX. I could than theoretically use the potentiometer to input values to the 555 and continually "blink" or broadcast that specific value out. The arduino with the FM receiver hooked to the RX or 0 pin of the microcontoller could than be told to listen for and return only that value or above that is being broadcast from the independent TX circuit.When the value was detected it could turn on the LED (and later scroll text in an LCD), hooked to pin 13 and ground of the MCU. This is my theory or method thus far. SO far i am not sure if its responding correctly or not. RIght now my hunch is that something is still amiss. I believe i need to test it with a 100k ohm Potentiometer as right now I am only using a 10kohm pot.
Subscribe to:
Posts (Atom)